OpenVINO™ による非同期推論#
この Jupyter ノートブックはオンラインで起動でき、ブラウザーのウィンドウで対話型環境を開きます。ローカルにインストールすることもできます。次のオプションのいずれかを選択します:


このノートブックでは、OpenVINO で非同期実行に非同期 API を使用する方法を示します。
OpenVINO ランタイムは、同期モードまたは非同期モードの推論をサポートします。非同期 API の主な利点は、デバイスが推論でビジー状態のときに、アプリケーションが現在の推論が完了するのを待つのではなく、他のタスク (例えば、入力の入力や他の要求のスケジュール設定) を並行して実行できることです。
目次:
インポート#
import platform

%pip install -q "openvino>=2023.1.0"
%pip install -q opencv-python
if platform.system() != "windows":
     %pip install -q "matplotlib>=3.4"
else:
     %pip install -q "matplotlib>=3.4,<3.7"
Note: you may need to restart the kernel to use updated packages.
Note: you may need to restart the kernel to use updated packages.Note: you may need to restart the kernel to use updated packages.import cv2
import time
import numpy as np
import openvino as ov
from IPython import display
import matplotlib.pyplot as plt
# openvino_notebooks リポジトリーからノートブック・ユーティリティー・スクリプトを取得
import requests
r = requests.get(
url="https://raw.githubusercontent.com/openvinotoolkit/openvino_notebooks/latest/utils/notebook_utils.py",
)
open("notebook_utils.py", "w").write(r.text)
import notebook_utils as utilsモデルとデータ処理の準備#
テストモデルをダウンロード#
テストを開始するには、OpenVINO の Open Model Zoo の事前トレーニング済みモデルを使用します。この場合、モデルが実行され、ビデオの各フレームで人物が検出されます。
# モデルがダウンロードされるディレクトリー
base_model_dir = "model"

# Open Model Zoo で命名されたモデル名
model_name = "person-detection-0202"
precision = "FP16"
model_path = f"model/intel/{model_name}/{precision}/{model_name}.xml"
download_command = f"omz_downloader " f"--name {model_name} " f"--precision {precision} " f"--output_dir {base_model_dir} " f"--cache_dir {base_model_dir}"
! $download_command
################|| Downloading person-detection-0202 ||################
========== Downloading model/intel/person-detection-0202/FP16/person-detection-0202.xml
========== Downloading model/intel/person-detection-0202/FP16/person-detection-0202.bin推論デバイスの選択#
import ipywidgets as widgets

core = ov.Core()
device = widgets.Dropdown(
    options=core.available_devices + ["AUTO"],
    value="CPU",
    description="Device:",
    disabled=False,
)

deviceDropdown(description='Device:', options=('CPU', 'AUTO'), value='CPU')モデルのロード#
# OpenVINO ランタイムを初期化
core = ov.Core()

# ファイルからネットワークと対応する重みを読み取り
model = core.read_model(model=model_path)

# CPU 用にモデルをコンパイルする (CPU、GPU などを手動で選択) か、
# エンジンに利用可能な最適なデバイスを選択させる (AUTO)
compiled_model = core.compile_model(model=model, device_name=device.value)

# 入力ノードを取得
input_layer_ir = model.input(0)
N, C, H, W = input_layer_ir.shape
shape = (H, W)データ処理の関数を作成#
def preprocess(image):     """
    Define the preprocess function for input data

    :param: image: the orignal input frame
    :returns:
        resized_image: the image processed
    """
    resized_image = cv2.resize(image, shape)
    resized_image = cv2.cvtColor(np.array(resized_image), cv2.COLOR_BGR2RGB)
    resized_image = resized_image.transpose((2, 0, 1))
    resized_image = np.expand_dims(resized_image, axis=0).astype(np.float32)
    return resized_image

def postprocess(result, image, fps):
    """
    Define the postprocess function for output data

    :param: result: the inference results
        image: the orignal input frame
        fps: average throughput calculated for each frame
    :returns:
    image: the image with bounding box and fps message
    """
    detections = result.reshape(-1, 7)
    for i, detection in enumerate(detections):
        _, image_id, confidence, xmin, ymin, xmax, ymax = detection
        if confidence > 0.5:
            xmin = int(max((xmin * image.shape[1]), 10))
            ymin = int(max((ymin * image.shape[0]), 10))
            xmax = int(min((xmax * image.shape[1]), image.shape[1] - 10))
            ymax = int(min((ymax * image.shape[0]), image.shape[0] - 10))
            cv2.rectangle(image, (xmin, ymin), (xmax, ymax), (0, 255, 0), 2)
            cv2.putText(
                image,
                str(round(fps, 2)) + " fps",
                (5, 20),
                cv2.FONT_HERSHEY_SIMPLEX,
                0.7,
                (0, 255, 0),
                3, )
return imageテストビデオを入手#
video_path =
"https://storage.openvinotoolkit.org/repositories/openvino_notebooks/data/data/video/CEO%20Pat%20Gelsinger%20on%20Leading%20Intel.mp4"ビデオ処理のスループットを向上させる方法#
以下では、同期ベースと非同期ベースのアプローチのパフォーマンスを比較します:
同期モード (デフォルト)#
デフォルトのアプローチでビデオ処理がどのように機能するかを見てみましょう。同期アプローチを使用すると、フレームは OpenCV でキャプチャーされ、すぐに処理されます:

描画#
while(true) {
// フレームをキャプチャー
// 現在の InferRequest を入力
// 現在の InferRequest を推論
//     この呼び出しは同期
// 現在の結果を表示
}
```
def sync_api(source, flip, fps, use_popup, skip_first_frames):
    """
    Define the main function for video processing in sync mode

    :param: source: the video path or the ID of your webcam
    :returns:
        sync_fps: the inference throughput in sync mode
    """
    frame_number = 0
    infer_request = compiled_model.create_infer_request()
    player = None
    try:
        # ビデオプレーヤーを作成
        player = utils.VideoPlayer(source, flip=flip, fps=fps, skip_first_frames=skip_first_frames)
        # キャプチャーを開始
        start_time = time.time()
        player.start()
        if use_popup:
            title = "Press ESC to Exit"
            cv2.namedWindow(title, cv2.WINDOW_GUI_NORMAL | cv2.WINDOW_AUTOSIZE)
        while True:
            frame = player.next()
            if frame is None:
                print("Source ended")
                break
            resized_frame = preprocess(frame)
            infer_request.set_tensor(input_layer_ir, ov.Tensor(resized_frame))
            # 同期モードで推論要求を開始
            infer_request.infer()
            res = infer_request.get_output_tensor(0).data
            stop_time = time.time()
            total_time = stop_time - start_time
            frame_number = frame_number + 1
            sync_fps = frame_number / total_time
            frame = postprocess(res, frame, sync_fps)
            # 結果を表示
            if use_popup:
                cv2.imshow(title, frame)
                key = cv2.waitKey(1)
                # escape = 27
                if key == 27:
                    break
            else:
                # numpy 配列を jpg にエンコード
                _, encoded_img = cv2.imencode(".jpg", frame, params=[cv2.IMWRITE_JPEG_QUALITY, 90])
                # Ipython イメージを作成
                i = display.Image(data=encoded_img)
                # このノートブックに画像を表示
                display.clear_output(wait=True)
                display.display(i)
# ctrl-c
except KeyboardInterrupt:
    print("Interrupted")
# 異なるエラー
except RuntimeError as e:
    print(e)
finally:
    if use_popup:
        cv2.destroyAllWindows()
    if player is not None:
        # キャプチャーを停止
        player.stop()
return sync_fps同期モードでパフォーマンス・テスト#
sync_fps = sync_api(source=video_path, flip=False, fps=30, use_popup=False, skip_first_frames=800)
print(f"average throuput in sync mode: {sync_fps:.2f} fps")
Source ended
average throuput in sync mode: 58.66 fps非同期モード#
OpenVINO 非同期 API がアプリケーションの全体的なフレームレートをどのように向上できるかを見てみましょう。非同期アプローチの利点は、デバイスが推論でビジーなときに、アプリケーションが現在の推論が最初に完了するのを待機することなく、他の処理 (入力の設定や他の要求のスケジュール設定など) を並行して実行できることです。

描画#
以下の例では、ビデオデコードに推論が適用されます。したがって、複数の推論要求を保持することが可能であり、現在の要求が処理されている間に、次の要求の入力フレームがキャプチャーされます。これにより、キャプチャーのレイテンシーが隠蔽されるため、全体のフレームレートはステージの合計ではなく、パイプラインの最も遅い部分 (デコードと推論) によってのみ決定されます。
while(true) {
// フレームをキャプチャー
// 次の InferRequest を入力
// 次の InferRequest を開始
// この呼び出しは非同期であり、すぐに戻ります
// 現在の InferRequest を待機
// 現在の結果を表示
// 現在の InferRequest と次の InferRequest を入れ替え
}
def async_api(source, flip, fps, use_popup, skip_first_frames):
"""
Define the main function for video processing in async mode
:param: source: the video path or the ID of your webcam
:returns:
async_fps: the inference throughput in async mode
"""
frame_number = 0
# 2 つの推論要求を作成
curr_request = compiled_model.create_infer_request()
next_request = compiled_model.create_infer_request()
player = None
async_fps = 0
try:
# ビデオプレーヤーを作成
player = utils.VideoPlayer(source, flip=flip, fps=fps, skip_first_frames=skip_first_frames)
# キャプチャーを開始
start_time = time.time()
player.start()
if use_popup:
title = "Press ESC to Exit"
cv2.namedWindow(title, cv2.WINDOW_GUI_NORMAL | cv2.WINDOW_AUTOSIZE)
# 現在のフレームをキャプチャー
frame = player.next()
resized_frame = preprocess(frame)
curr_request.set_tensor(input_layer_ir, ov.Tensor(resized_frame))
# 現在の推論要求を開始
curr_request.start_async()
while True:
# 次のフレームをキャプチャー
next_frame = player.next()
if next_frame is None:
print("Source ended")
break
resized_frame = preprocess(next_frame)
next_request.set_tensor(input_layer_ir, ov.Tensor(resized_frame))
# 次の推論要求を開始
next_request.start_async()
# 現在の推論結果を待機
curr_request.wait()
res = curr_request.get_output_tensor(0).data
stop_time = time.time()
total_time = stop_time - start_time
frame_number = frame_number + 1
async_fps = frame_number / total_time
frame = postprocess(res, frame, async_fps)
# 結果を表示
if use_popup:
cv2.imshow(title, frame)
key = cv2.waitKey(1)
# escape = 27
if key == 27:
break
else:
# numpy 配列を jpg にエンコード
_, encoded_img = cv2.imencode(".jpg", frame, params=[cv2.IMWRITE_JPEG_QUALITY, 90])
# Ipython イメージを作成
i = display.Image(data=encoded_img)
# このノートブックに画像を表示
display.clear_output(wait=True)
display.display(i)
# 現在のフレームと次のフレームを入れ替え
frame = next_frame
# 現在の推論要求と次の推論要求を入れ替え
curr_request, next_request = next_request, curr_request
# ctrl-c
except KeyboardInterrupt:
print("Interrupted")
# 異なるエラー
except RuntimeError as e:
print(e)
finally:
if use_popup:
cv2.destroyAllWindows()
if player is not None:
# キャプチャーを停止
player.stop()
return async_fps非同期モードでパフォーマンスをテスト#
async_fps = async_api(source=video_path, flip=False, fps=30, use_popup=False, skip_first_frames=800)
print(f"average throuput in async mode: {async_fps:.2f} fps")
Source ended
average throuput in async mode: 103.49 fpsパフォーマンスを比較#
width = 0.4
fontsize = 14

plt.rc("font", size=fontsize)
fig, ax = plt.subplots(1, 1, figsize=(10, 8))

rects1 = ax.bar([0], sync_fps, width, color="#557f2d")
rects2 = ax.bar([width], async_fps, width)
ax.set_ylabel("frames per second")
ax.set_xticks([0, width])
ax.set_xticklabels(["Sync mode", "Async mode"])
ax.set_xlabel("Higher is better")

fig.suptitle("Sync mode VS Async mode")
fig.tight_layout()

plt.show()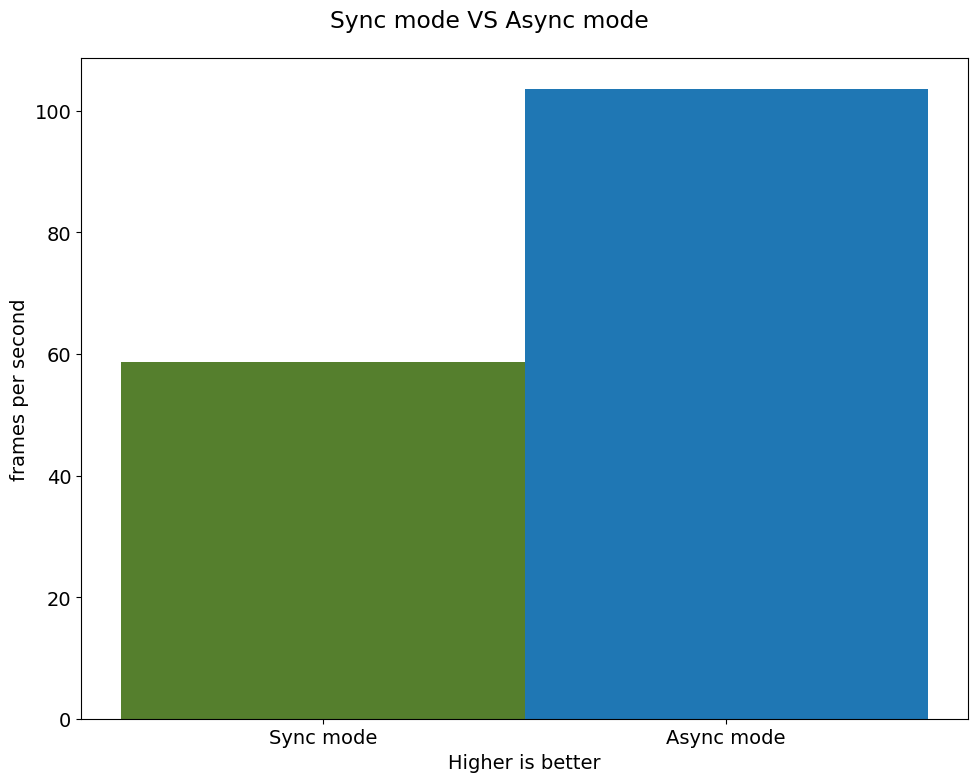
AsyncInferQueue#
非同期モード・パイプラインは、AsyncInferQueue ラッパークラスでサポートできます。このクラスは、InferRequest オブジェクト ( “ジョブ” とも呼ばれます) のプールを自動的に生成し、パイプラインのフローを制御する同期メカニズムを提供します。これは、非同期モードで推論要求キューを管理するより簡単です。
コールバックの設定#
Callback が設定されていると、推論を終了するジョブは Python 関数を呼び出します。Callback 関数には 2 つの引数が必要です。1 つは callback を呼び出す要求で、InferRequest API を提供します。もう 1 つは “ユーザーデータ” と呼ばれ、ランタイム値を渡す可能性を提供します。
def callback(infer_request, info) -> None:
    """
    Define the callback function for postprocessing

    :param: infer_request: the infer_request object
        info: a tuple includes original frame and starts time
    :returns:
        None
    """
    global frame_number
    global total_time
    global inferqueue_fps
    stop_time = time.time()
    frame, start_time = info
    total_time = stop_time - start_time
    frame_number = frame_number + 1
    inferqueue_fps = frame_number / total_time

    res = infer_request.get_output_tensor(0).data[0]
    frame = postprocess(res, frame, inferqueue_fps)
    # numpy 配列を jpg にエンコード
    _, encoded_img = cv2.imencode(".jpg", frame, params=[cv2.IMWRITE_JPEG_QUALITY, 90])
    # Ipython イメージを作成
    i = display.Image(data=encoded_img)
    # このノートブックに画像を表示
    display.clear_output(wait=True)
    display.display(i)
def inferqueue(source, flip, fps, skip_first_frames) -> None:
"""
Define the main function for video processing with async infer queue
:param: source: the video path or the ID of your webcam
:retuns:
None
"""
# Create infer requests queue
infer_queue = ov.AsyncInferQueue(compiled_model, 2)
infer_queue.set_callback(callback)
player = None
try:
# ビデオプレーヤーを作成
player = utils.VideoPlayer(source, flip=flip, fps=fps, skip_first_frames=skip_first_frames)
# キャプチャーを開始
start_time = time.time()
player.start()
while True:
# フレームをキャプチャー
frame = player.next()
if frame is None:
print("Source ended")
break
resized_frame = preprocess(frame)
# 非同期推論キューで推論リクエストを開始
infer_queue.start_async({input_layer_ir.any_name: resized_frame}, (frame, start_time))
except KeyboardInterrupt:
print("Interrupted")
# 異なるエラー
except RuntimeError as e:
print(e)
finally:
infer_queue.wait_all()
player.stop()AsyncInferQueue でパフォーマンスをテスト#
frame_number = 0
total_time = 0
inferqueue(source=video_path, flip=False, fps=30, skip_first_frames=800)
print(f"average throughput in async mode with async infer queue: {inferqueue_fps:.2f} fps")
average throughput in async mode with async infer queue: 149.16 fps